June 2, 2013

Frozen Banana Nut Pops ~ Sweet Treats On A Stick #LMDConnector

Summer is just around the corner and that brings changes in my family's eating.  We BBQ almost daily, and eat outside as often as we can.  Preparing quick, easy, outdoor friendly meals is as important on a busy weeknight as it is when entertaining on the weekend.

One thing that we love is serving food on sticks.  Not only does this quicken cooking times for my husband and I, but the boys love it!  Desserts and snacks on sticks are also fun and the boys love helping me to make these treats.

I love frozen fruit, and one of my favourite childhood summer memories is eating frozen banana pops at the local fair in Toronto.  Dipped in chocolate and rolled in chopped nuts, it was a perfect way to end an exciting day!  We decided to make our own at home and they were an instant hit.


Frozen Banana Nut Pops

Ingredients:
4 ripe bananas, peeled and cut into three equal parts
1 jar caramel ice cream topping
1 jar chocolate ice cream topping
1 cup roughly chopped walnuts or pecans
12 large lolipop sticks
 
Directions
1. Insert a lolipop stick into each banana.

2. Coat 6 bananas with caramel topping and 6 bananas with chocolate topping.  Roll each banana in chopped walnuts and place on baking sheet.
3. Freeze for at least 2 hours.  Serve.

Banana Pops ready for toppings!

Chopped pecans

Banana Nut Pops ready for the freezer


I didn't hear a peep while Lil-J gobbled up his treat!
Big-A loved helping to make the Banana Nut Pops and was more than happy to taste-test them!


Ice cream cones and freezes are treats that would put a smile on anyone's face.  But it's fun to try different things, and to get the kids involved.  Try making Frozen Banana Nut Pops with your family for a filling, refreshing treat.

The desserts tab on the Life Made Delicious website lists hundreds of recipes.  Here are four that I have tried and love (Fresh Fruit Frozen Yogurt Pops...YUM!) or will be testing out this summer with my kids and our BBQ guests.

Fresh Fruit Frozen Yogurt Pops
A perfect afternoon snack on a hot day!
http://lifemadedelicious.ca/en/recipes/f/fresh-fruit-frozen-yogurt-pops
 
Fruit Kabobs With Pineapple Dip
A fun dessert for a family BBQ at the park!
http://lifemadedelicious.ca/en/recipes/f/fruit-kabobs-with-pineapple-dip

Brownies & Chocolate Raspberry Fondue
Perfect for a romantic dinner for two or dinner with close friends!
http://lifemadedelicious.ca/en/recipes/b/brownies-and-chocolate-raspberry-fondue

  Brownie & Fruit Kabobs
A dessert for any occasion!
http://lifemadedelicious.ca/en/recipes/b/brownie-and-fruit-kabobs

Check out the Life Made Delicious website for recipes fit for any season or occasion.  Get creative and involve the kids in the fun of preparing hot weather treats.

 
I’m part of the Life Made Delicious blogger program and I receive special perks as part of my affiliation
with this group. As with every post that I write, the opinions on this blog are my own.

April 1, 2013

Spring Has Sprung...Salad Season Is Here!


Spring brings many new things.  New growth on trees and in thawing gardens.  New wildlife, eggs in nests and insects breaking through ground.  New outdoor family activities, new trails and parks to discover, and new sports teams to get acquainted with.  Spring seems to breathe life in everything around us, making us feel more alive every day.  And there's no better way to get into spring mode than with healthy eating!

Spending more time outdoors makes refueling your body even more important.  One way that my family loves refueling is by eating salads...lots and lots of salads.  We eat them throughout the week for school and work lunches, and we often serve up side salads with meals or BIG salads as the main meal during weeknight dinners and weekend lunches.


Lil-J scooting on a gorgeous spring day!
Big-A showing off his skateboarding skills!


I


I always think of complete meals when making salads.  Along with a selection of greens, I add a variety of vegetables and lean protein.  Our favourite protein sources are cold steak or chicken and boiled or poached eggs.  Using leftover meats and vegetables is one of the easiest ways to add extra ingredients to any salad.

A fresh dressing is an absolute must when building the perfect salad.  I always use olive oil as the base, with different vinegars or citrus juices to change the flavour.  At any grocery store you will find a huge selection of different salad dressing, but I like making it myself.

My most recent salad creation came to me on a busy Saturday afternoon.  We had a lot to do with very little time, and I decided to throw together a salad for lunch.  Using leftovers from Friday night's dinner and ripe, fresh produce, I made a delicious and nutritious salad that the entire family loved (well, everyone but Lil-J as he's not at all into salads!).

A mouth-watering salad creation ~ Southwestern Tangy Chicken Salad


Southwestern Tangy Chicken Salad
(makes 4 side dishes or 2 main dishes)

Salad Ingredients:
1 head of fresh romaine lettuce, washed and dried
1 handful of fresh baby spinach, washed and dried
1 ripe avocado, peeled and sliced
1 cooked chicken breast, chopped
1/2 cup cooked corn niblets

Tangy Dressing Ingredients:
3 tbsp extra virgin olive oil
5 tbsp balsamic vinegar
1 tbsp grainy mustard
1 tsp yellow mustard
1 tbsp freshly grated parmesan cheese
pinch of ground black pepper

Directions:
1. Add all salad ingredients to a large bowl.
2. Add all dressing ingredients to a small bowl, whisk together.
3. Pour dressing mixture over salad ingredients, toss to coat, serve.

It really doesn't get easier than that.  The salad was fresh tasting, light and very filling.  A perfect meal for a busy family on the go.  Big-A absolutely loved it, asking for seconds!

Most salads that I make are inspired by recipes that I've seen on my favourite Food Network shows or that I find in food magazines.  As an #LMDConnector, another source that I use for numerous recipes is the Life Made Delicious website.  By simply typing the word "salad" in the search field, you will find hundreds of recipes to choose from.  And you won't just find traditional salads on the site.  Salad wraps are great when you're on the go, or to change things up from the usual salad-in-a-bowl.  I LOVE cobb salad, and the Cobb Salad Wraps are easy to make and full of nutrients.  Check out the Life Made Delicious website to get salad inspired!


From the Life Made Delicious website ~ Cobb Salad Wraps

It's easier than you think to add delicious salads to your meal plan.  Get creative with ingredients that suit your family's taste.  Making simple changes to ingredients, changing the flavours of the dressing, and making sure to have fresh product on hand will guarantee you salad success each and every time!


I’m part of the Life Made Delicious blogger program and I receive special perks as part of my affiliation with this group. As with every post that I write, the opinions on this blog are my own.

March 21, 2013

Easter Celebrations With Kinder®!


Spring is finally here!  A time of rebirth and new beginnings, a season where the outdoors wake from a long winter sleep, my favourite time of year.  Although we still have cold and snowy weather in the GTA, I'm quickly getting into spring mode, ready to put away boots and hats and start up the BBQ.  One of my favourite things about spring is celebrating Easter with my family.

As a child, I have wonderful memories of Easter egg hunts with my siblings, decorating eggs with my mother and putting on my prettiest dress for church.  My boys love Easter too, and already have great memories of past holidays.

We have had fun-filled Easter weekends at our own home and at the cottage.  Last year, family friends had us over for an outdoor chocolate hunt where treats were hidden in trees, shrubs and in gardens.  Just the other day I was chatting with Lil-J about his favourite thing about Easter and he remembered finding his special chocolate in a pile of fire wood last year.  And we found an awesome Kinder® Easter Egg Hunt Kit at Costco and the boys had a blast hunting for their favourite chocolate!


My boys loved hunting for Kinder® treasure last Easter!


This year we're staying home, as we'll also be celebrating two family birthdays that same weekend.  It's a busy time of year but I love any reason to get together with my family.  This year is extra special, as my (first) nephew was born in January and this will be his first official holiday spent with his 5 big cousins.

As a #KINDERMom, I'm looking forward to planning an Easter egg hunt for the boys, and Kinder® will definitely make an appearance on that fun morning. The fantastic folks at Kinder® were kind enough to send us a basket filled with Easter goodies like mini eggs, a bunny and a giant classic Kinder® egg. We also received an egg decorating kit which we will be using Easter weekend. The boys love arts and crafts, and I think I'll have as much fun as they will decorating eggs!
 
A Kinder® Easter Bunny with a surprise inside!


Adorable plush Kinder® toys would put a smile on any child's face on Easter morning!
 
Along with offering delicious, adorable and fun Easter treats in stores, Kinder® Canada is  is also helping those in need through their partnership with Children's Miracle Network and the A Joy To Share program.  With every LIKE on the Kinder® Canada Facebook page, Kinder® will donate $1 to Children's Miracle Network in the month of March.  These donations are helping families of sick children all over Canada.  If you haven't already, head over to the Kinder® Canada Facebook page and LIKE to help!
 
 
Enjoy the spring weather that is quickly on it's way, and enjoy Easter weekend with your families.  We can't wait to start the celebrations!


I’m part of the KINDER® Mom program and I receive special perks as part of my affiliation with this group.
As with every post that I write, the opinions on this blog are my own.

February 28, 2013

New Peanut Butter Cheerios, For A Limited Time! #LMDConnector


Peanut butter is one of those foods that brings me back in time, back to my childhood.  For as far back as I can remember, I've always loved peanut butter.  In cookies, on toasted English muffins and even straight out of the jar with a spoon, it's one of my favourite comfort foods.  My favourite peanut butter meal of all time is a toasted peanut butter & banana sandwich.  At least once a week I bring one to work with me for breakfast.


My favourite quick breakfast ~ a toasted peanut butter and banana sandwich! Yum!

As a #LMDConnector, I am privy to news of new and limited time only General Mills products.  When I heard that General Mills Peanut Butter Cheerios was hitting store shelves March 4, I couldn't have been more excited and I couldn't wait to be one of the first people to try them!  I was thrilled to receive a couple of boxes of Peanut Butter Cheerios in the mail, along with handy food containers that will be put to good use!  I was sure that I would love the cereal, but I decided to use Big-A for my first taste-test.  Big-A will eat anything you put in front of him...except for cereal.  And it drives me CRAZY!

On busy weekday mornings, I would love it if I could put a bowl of cereal in front of him each and eveyr day while I'm preparing lunches, getting his backpack together, and getting myself ready for work.  But life is never that easy, is it?  Usual requests from Big-A are boiled eggs & toast or oatmeal with cinnamon.  I am more than happy to make him a healthy breakfast, as I know how important it is for children to start their day with a healthy meal.  But on the craziest of mornings, I really do wish he would eat a bowl of cereal.

As usual, Big-A was less than thrilled to be sitting in front of a bowl of cereal on the morning of the taste-test.  But he gave them a try, and here are the results:


After a few bites, he loved them!  And I am happy to say that I haven't had to battle with him to eat them on busy weekday mornings.  He still requests his usual eggs or oatmeal, but I know that I have a cereal option that he'll eat on the really crazy mornings.  As soon as I opened the cereal box I was instantly hit with the delicious aroma of peanut butter.  And the peanut butter flavour tastes real, not artificial as it does in many other cereals.

As I mentioned earlier, Peanut Butter Cheerios will hit store shelves March 4, but they will only be available for a limited time.  If peanut allergies are not a concern for you or your family, make sure to give them a try!

Make sure to check out the Life Made Delicious website for product information, meal tips and delicious recipes using your favourite General Mills products.  And don't forget to "like" the Life Made Delicious - General Mills Canada Facebook page for coupons, contests and product information.


I am participating in the Life Made Delicious Ambassador Program by Mom Central Canada on behalf of
General Mills.  I received compensation as a thank you for participating and for sharing my honest opinion.
As with every post that I write, the opinions on this blog are my own.

February 10, 2013

Easy Meal Ideas With New Cavendish From The Farm Homestyle PEI Potatoes!

I love talking food, and I especially love talking Canadian-made food.  I'm a huge supporter of buying Canadian meat, dairy and produce whenever I can.  Which is why I was thrilled to hear that I was one of a group of "foodie" bloggers chosen to promote new Cavendish From The Farm frozen potatoes!  These quality frozen, homestyle potatoes come from the rich red soil of PEI farms.  Available in Wedges, Straight Cut and Rustic Reds, the skin has been left on and they're prepared with 100% canola oil and sea salt for a superior taste.  Check out the website at http://www.cavendishfarms.com/grocery-ca-products-from-the-farm.aspx for information on Cavendish Farms, and their awesome products.

If you've read my blog recipes in the past, you'll know that I love healthy, delicious, fast meals, especially during the busy work week.  Now I'm not talking about takeout, soup & sandwiches, or the odd night that we eat cereal for dinner.  I'm talking about good, homemade meals that you can make in a flash, with little preparation required.  And I knew that Cavendish From The Farm potatoes would be a perfect addition to a quick family dinner.

While shopping at my local grocery store, I found all three types of Cavendish From The Farm potatoes available.  I chose Rustic Reds because I love the taste red skinned potatoes.  I was impressed with the nutritional ingredients, with the fat and sodium being much lower than in comparable frozen potatoes.


New #CavendishFromTheFarm frozen potatoes!


Deciding what to add the Rustic Reds to was easy - drumsticks and veggies on the side.  Although I love roasting large cuts of meat and grilling steaks on the BBQ, I also love serving less expensive cuts of meat like drum sticks and chicken thighs.  I purchased a package of 8 chicken drumsticks for $7.00, a great deal!  Preparation was quick and easy, and the meal was delish!


Spicy Buttermilk Chicken Drumsticks

Ingredients:
1 pkg (8-10) fresh chicken drumsticks (skin on or skinless, your choice)
2 cups milk
3 tbsp white vinegar
1/2 tsp salt
1/2 tsp cracked black pepper
1 tsp paprika
1/4 tsp chili powder
1 bag Cavendish From The Farm potatoes

Directions:
1.  Prepare the buttermilk by adding 3 tbsp white vinegar to 2 cups milk.  Let sit for 5 minutes to sour and curdle.
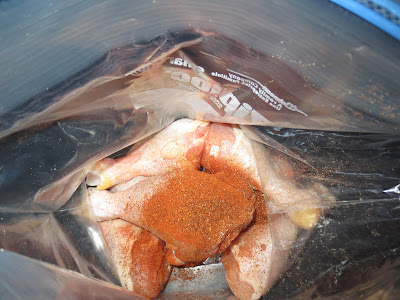
2.  Place fresh drumsticks in a large Ziplock bag, add salt, pepper, paprika and chili powder.
3.  Pour buttermilk over the seasoned chicken, squeeze the air out the the bag and seal.  Mix the drumsticks around in the buttermilk to coat.  Place the bag in the refrigerator for no less than 30 minutes.  You can prepare this in the morning and leave them to soak all day.
4.  Heat the oven to 425 degrees F.  Remove the drumsticks from the bag and shake off any excess liquid.  Place them on a parchment-lined baking sheet.  Roast in the oven for approximately 45 minutes (or until the internal temperature reads 165 degrees).
5.  Halfway through cooking the drumsticks, place a bag of Cavendish potatoes on a parchment-lined baking sheet.  Roast in the oven until the drumsticks are cooked.
6.  Serve with steamed vegetables or salad, enjoy!


And the results?  The meal was delicious!  The chicken drumsticks were juicy and the the boys gobbled up the potatoes instantly.  What I love about these potatoes is that they really are a blank canvas.  They can be served as is, or drizzled with olive oil and herbs for a perfect side dish.  And I will definitely be using these Rustic Reds for my Almost Famous Roasted Potato Salad!


Have all ingredients ready to go for a successful quick meal!

Get creative with different herbs or spices to flavour meats.

Chicken drumsticks marinating in spicy buttermilk!

Chop and wash veggies ahead.

I love red-skinned potatoes.  And this preparation can't get any easier!

Marinated chicken drumsticks ready for roasting.

So good!

A delicous, complete meal perfect for a busy family on the go or a lazy Saturday night.

It is possible to serve quick, healthy, delicious meals for your family without spending hours in the kitchen. Look for meals with just a little prep required, that cook without supervision. Get creative with flavours, using dried or fresh herbs, spices and homemade marinades, in order to keep simple meals interesting. And give Cavendish From The Farm frozen potatoes a try - you will be quick to add them to your weekly mealplan!


I am participating in the From The Farm blog tour by Mom Central Canada on behalf of Cavendish.  I received compensation as a thank you for participating and sharing my honest opinionAs with every post that I write, the opinions on this blog are my own.

February 1, 2013

Kinder® Spreading Joy With New Barbie™ & Hot Wheels™ Toys And A Contest You'll Want To Win!

Kinder® Surprise chocolate eggs are awesome on their own, with the original new 2013 toy collection giving kids a lot to smile about!  They have now outdone themselves with a new line of toys guaranteed to bring smiles and cheers of joy to any home.  What's better than Barbie™ and Hot Wheels™ toys?  According to my boys and my nieces, there really isn't much that compares!
 
Another exciting announcement from Kinder® is the contest they are running on their Facebook page.  It started January 10, and running for four weeks the generous group at Kinder® are giving away 40 Kinder® Barbie™ Hot Wheels™ prizepacks.  By simply becoming a fan of Kinder® Canada's Facebook page and following the instructions given, you will have the chance to win a pack of 24 Kinder® Surprise eggs, including Barbie™ Hot Wheels™ toys!  It's that easy!


When I first opened the box of Barbie™ Hot Wheels™ Kinder® Surprise eggs (one of the many perks of being a #KINDERMom!), my boys went crazy for the Hot Wheels eggs!  And being the only female of the household, I felt a twinge of excitement at the thought of opening a Barbie toy!  I had to place limits on the numer of eggs the boys ate each week (as I do with all treats), but we have had fun with them.  Each time that I placed the foil-wrapped egg in front of Big-A, he would shake it as if he could tell that there was a car inside!  Lil-J is always more interested in gobbling up the chocolate.  We quickly realized that the eggs containing Barbie™ & Hot Wheels™ toys are orange (the regular eggs are yellow) and that became another fun part of opening the eggs.


Lil-J chomping on chocolate, not too concerned with the toy just yet!

A sweet brother moment, checking out the Kinder® loot!


Lil-J putting stickers on his Hot Wheels car!
 
A rare moment - both boys got Hot Wheels cars!
 
What a kid!

The boys have had loads of fun with their Hot Wheels cars, and have a little competition going on who can find the most colours!  They have also enjoyed sharing the Barbie eggs with their cousins - three girls.

Make sure to follow Kinder® Canada's Facebook page for a chance to win a prize pack, and keep an eye out for future contests. 


I’m part of the KINDER® Mom program and I receive special perks as part of my affiliation with this group.
As with every post that I write, the opinions on this blog are my own.

January 29, 2013

Game Day Guacamole ~ More Than Just A Dip! #LMDConnector

The Super Bowl is back again!  And I must admit, it's not the football that excites me (except for the site of Tom Brady, of course!).  I've never been a football fan, although I'm married to a serious football ADDICT!  What I do like about Super Bowl is the food!  I love bar food - dips, nachos, homemade chili, and deep fried anything.  My mouth is watering just thinking about it!

When it comes to party foods, one of my favourite dishes to make is guacamole.  I've tried many different recipes over the years, but I always go back to one that I created on my own, with simple ingredients and ready in just a few minutes.


Before making homemade guacamole, you have to start with perfectly ripe avocados.  You can buy them ripe (look for pebbled, dark green or black skin) or unripe (look for smooth green skin).  When purchasing ripe avocados, they should yield to gentle pressure but should not be overly soft or mushy.  If you purchase unripe avocados, you can ripen them at home in 3-5 days by placing them in a paper bag on your kitchen counter.  I also speed up the process by storing them in a fruit bowl with bananas for a few days.

Once you have the perfect avocados, you're ready to make guacamole!

Ingredients:
2 ripe avocados
1 heaping tablespoon of your favourite salsa
juice of 1 lime
pinch of salt

Directions:
1. Using a large kitchen knife, slice the avocado in half lengthwise.  Gently twist the two halves in opposite directions.  Remove the pit by tapping it with the sharp side of the knife or spooning it out.  Peel the skin off of the avocado (you can also use a large spoon to remove the flesh from the skin) and place the avocado pieces in a bowl.  Repeat with the 2nd avocado.
2. Mash the avocado with a fork, leaving small chunks.
3. Add the juice of one lime, salsa and salt.  Mix well to combine.
4. Serve with fresh veggies or unsalted tortilla chips, enjoy!


Mash avocado, leaving small chunks.


Fresh-squeezed lime juice is an absolute MUST!


I like to add my favourite salsa for extra flavour.


Leaving the pit in a bowl of guacamole will not prevent
it from oxidizing (turning brown) - that is a myth.
 But I do leave it in the bowl for presentation purposes!


Yum!  Ready to eat!

Guacamole is a perfect dip for a party.  But it doesn't stop here!  You can use guacamole as an ingredient for some delicious recipes that will have your Super Bowl guests drooling!  Check out the Life Made Delicious website for some easy, delish recipes for game day.  Here are some of my favourites:


Add avocados to your diet and favourite recipes.  Add a little flavour and enjoy with family and friends while cheering on your favourite team this weekend!


I’m part of the Life Made Delicious blogger program and I receive special perks as part of my affiliation with this group. As with every post that I write, the opinions on this blog are my own.

January 2, 2013

Quick & Healthy Breakfast Options For Busy Mornings - Homemade Pancakes!


For those of you who have kids and are enjoying a two-week break from preparing school lunches, I'm just as happy and relieved as you are!  A small break is just what I needed.  But back-to-school is just around the corner (sorry to be a Debbie-Downer!) and I'm already thinking of quick lunch ideas, stocking my pantry and planning for crazy morning madness.
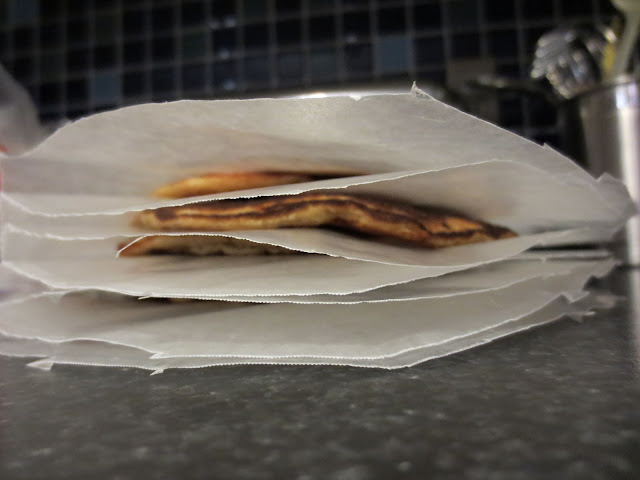
One tried and true breakfast idea that works for me is batch cooking.  It's not just for dinner anymore!  When making pancakes, french toast, or even oatmeal, I cook double the amount needed and refrigerate or freeze the rest.  This is best done on Sunday, giving you a quick and healthy homemade breakfast throughout the week for yourself and the kids.

In September, I posted a Gluten-Free option to my favourite buttermilk pancakes.  These GF Buttermilk Banana Bread Pancakes are delicious, and my entire family loves them!  They are also excellent re-heated, as the texture isn't affected at all.  Simply place them in the microwave for 30 seconds, or heat in the toaster.


Place a piece of wax paper between each pancake to prevent them from sticking.  Using scissors, trim the paper.


Place the pancake stack in a Ziplock Freezer Bag and store in the refrigerator for up to 4 days, or in the freezer for up to 2 weeks.


Cereal, Nutella on toast and breakfast bars are on my list of go-to quick breakfast options for my kids, but it's also possible to serve homemade pancakes in just a few minutes.  Add a glass of milk and a bowl of berries for a healthy breakfast and a perfect start to the day!